Monday, January 31, 2011

Blogging Back-log...

It has been quite a while since I have gotten down to the business of blogging regularly. Thanks to the Daring Kitchen, I am guaranteed to post a couple of times a month, but, considering how frequently I cook, bake and craft, and take pictures of the process, it seems I have amassed a small collection of things I have been wanting to post about but haven't... So I am going to try to fix that situation, and share some of the things we have been up to recently.

Several months ago I was Foodgawking and came across a recipe that sounded fabulous. Fairly easy, pretty to look at, and best of all, it's a potato dish! I kept it in the back of my mind, but never got around to it... Then someone else posted pictures of their version of the dish. I took this as a sign that I really was supposed to give this a shot. And that is what led to me making mini-Pommes Anna.

With my helper at my side, (after the slicing, of course,) I got to layering my potatoes, margarine, salt and pepper into a muffin tin. This was great fun, and good practice counting, too! (How many slices per layer?)
Once the muffin cups were filled, the tin went into the oven. When they came out, I wasn't sure what to think. The potatoes were not as crispy looking as I had expected. I wasn't sure what would happen when I flipped them out onto my plate.

Luckily, potatoes are not the easiest things to mess up. Especially when they are prepared so simply. The potatoes came out of the pan well, with a little bit of encouragement, and the tops (once the bottoms....) were crispy and golden. I loved eating away at these layer by layer... I can't wait to make them again. They will be perfect for one of those times when you want to look fancy without putting in the fancy effort...!

Thursday, January 27, 2011

Daring to do it: Joconde Imprime/Entremet

(This is going to be a kind of long, kind of photo-heavy post. I will do my best to keep it manageable!)
The January 2011 Daring Bakers’ challenge was hosted by Astheroshe of the blog accro. She chose to challenge everyone to make a Biscuit Joconde Imprime to wrap around an Entremets dessert.

When I first saw this challenge, I was convinced there was some sort of catch. This looked complicated, it looked time intensive, it looked just plain hard! Heck, I wasn't even sure I could pronounce the challenge, let alone complete it in a way that wouldn't be a total embarrassment! After seeing some of my fellow Daring Bakers' work, though, I began to get inspired. I knew my cake wouldn't look like theirs, but their enthusiasm made me want to dive in. The given recipe told us how to make the joconde paste and sponge, but the entremet (inside filling) was completely up to us. Therefore, that was the part I was obsessing over! So many options for flavors, textures, combinations... It was really daunting. I finally decided to stick with something I knew and trusted. Chocolate and vanilla. Puddings were what I chose. (I did not photograph the making of these puddings, though, since I knew that the outside would be the more interesting part...!) I used my go-to recipe for the chocolate pudding, and for the vanilla I used this pastry creme recipe from Silk Soymilk's recipe collection. Both are keeper recipes on their own, and they worked together really nicely, too! I made both of these puddings early in the day and let them set in the fridge so they would be ready for me when I was ready to fill my dessert.
Now for the interesting part...!

When I first looked at the recipe for the joconde and decorating paste, I was intimidated by the sheer number of eggs - egg whites, specifically, I would be needing. After reading the comments of some of the other Bakers, though, I learned that I would be able to halve the recipe and still have more than enough batter to complete the challenge. I started with a half-batch of the decoration paste. After mixing the batter I had to choose colors. I chose green (Hubby's favorite color), blue (my favorite color), and purple (my mom's favorite color, and she was visiting). For the design I decided to kind of just wing it. I made a rectangle to be cut for the ring of cake and two discs for support and the base.
Once the designs were piped, the trays had to be put into the freezer to set up solid. That's the easy part, right? That is where disaster struck. My base design piece decided that it didn't want to go into the cold. It jumped. Onto the floor. Paste side down. I was not happy... But if the design in the cake would come out anything like the design on the floor, I thought this might not be a total waste... Thankfully, even a half-batch of paste left me with more than enough to redo my swirls, so I was able to redo my base and safely get it into the freezer. (I must say, though, that if this had happened to someone with more artistic talent who had made an actual, intricate design, it would have been HEARTBREAKING!)
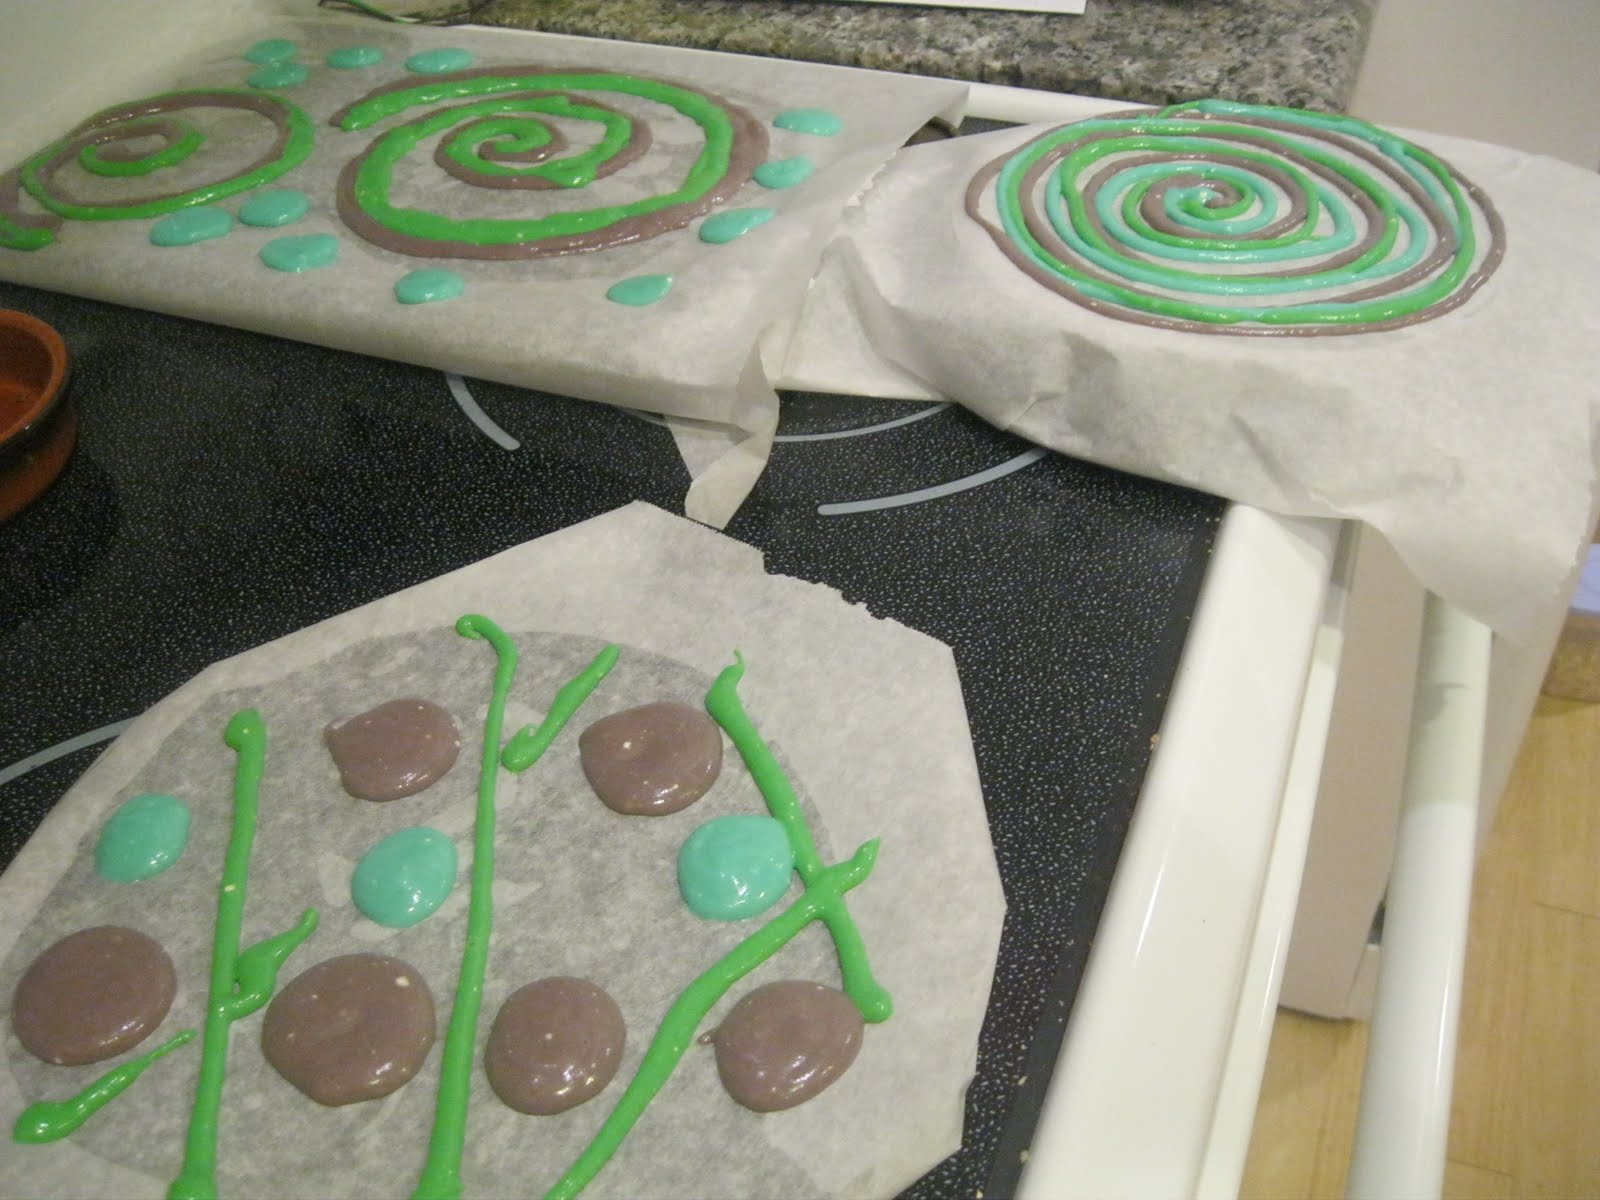
While the decor paste set I made my half-batch of the joconde sponge batter. This half batch did not feel nearly as generous as the half-batch of paste had seemed. I was worried that I would not have enough batter to cover all of my pieces. Luckily, though, the idea is to make a thin layer to keep the sponge flexible. With a little bit of encouragement I was able to get my sponge spread out and get the trays into the oven. Being so thin, this was a baking process that needed to be watched carefully. I felt like I was watching a souffle rise! This cake can bake through in anywhere from four to 15 minutes. So I sat in front of the oven watching for signs of doneness...! Once the cakes were done (about eight minutes for me) they were taken out of the oven to cool for a minute before being flipped out onto powdered sugar coated parchment paper. I am not usually one to pat myself on the back, but when I flipped the cakes over and saw the designs I couldn't help but say out loud "Wow! That looks so cool!" (Moreso the colors and the imprint on the cake than the actual design, but, still!) Now I was REALLY excited to see how the finished dessert would be!

Now that all of my elements were ready it was time to build the final piece. (I am going to do my explaining in one lump, then put all of the pictures together at the bottom.) I started with the outside ring of sponge. This was actually the hardest part for me! I really tried to get my pieces in tightly, trying to get my cake walls to be somewhat solid. It didn't happen so well. My seams were not so tight. But they held together fine, so I have something to work towards next time...! Once the sides were as built as I could get them I put my base disc on the bottom. Then came a layer of chocolate pudding. Then some strawberries, because, yum! Then the second sponge disc to separate the layers, topped with the vanilla pastry creme. On top of that went more strawberries, then the whole thing went into the fridge for a final set.


I had to admit, after each step I just got more and more excited. I saw that this was really coming together, and had pretty high hopes for a really awesome looking dessert. When the time came to plate and serve, I was not disappointed! Sure, my piping and design are pretty amateur, and the edges and lines could use some work. But I was thrilled! This is a dessert I want to keep around and pull out for a special event! Or an event which I want to make feel special!!

Thank you so much, Astheroshe, for introducing me to this amazing technique! I can honestly say that I would have never dreamed of making something so intricate, and you have opened my eyes to a new world of possibilities. I can not wait to do this again!
Please treat yourself to a peak at the amazing creations done by my fellow Daring Bakers!

Friday, January 14, 2011

Daring to do it: Cassoulet

Our January 2011 Challenge comes from Jenni of The Gingered Whisk and Lisa from Parsley, Sage, Desserts and Line Drives. They have challenged the Daring Cooks to learn how to make a confit and use it within the traditional French dish of Cassoulet. They have chosen a traditional recipe from Anthony Bourdain and Michael Ruhlman.

Living in the northeastern part of the U.S., it is expected that winters will be cold. During these cold months, I love nothing more than a nice, hot meal to warm me up inside and out. This challenge looked to be perfect for this time of year (at least in my part of the world, that is!). But I was a bit hesitant. Cassoulet is traditionally a meat dish. Like, four different kinds of meat. Would a vegetarian version really stand up to the tradition? (I was also kind of wondering if the veggie version would be much different than the bean based vegetable soups and stews I generally make.) And the confit... Cooking/preserving in fat. Ummm.... really? While I am sure that the carnivorous/omnivorous Daring Cooks would disagree with me, even the photos of both processes looked less than appealing to me... It took me a couple of weeks to dive into this challenge....
Once I got myself into the proper mindset (you know, "Well, I don't want to skip a month, and it can't hurt to know a new bean stew,") I got to work. Most of the ingredients for this cassoulet are things I keep on hand. White beans? Check. Carrots? Yup. Celery? Usually. Garlic? Always! Leaks were the one ingredient I had to make an effort to (remember to) have on hand. Other than that, there were some herbs that I don't keep around, as wouldn't use them often enough, but I figured that improvising the spice mix would be just fine. (You can check out the posted recipes, meat and vegetarian, here.)
I started by soaking a full pound of Great Northern Beans over night, then simmering them until they were tender. (Again, nothing new to me, but a process which I enjoy more than anyone really should...!) While the beans were simmering I took the "down time" opportunity to make my confit. While the garlic confit recipe given by our hosts looked really good, I wasn't sure I could handle pealing that quantity of garlic! (65 cloves!) So I looked around on-line, trying to see if there was another recipe which might be a bit more manageable. I decided to sort of combine recipes I found, and covered garlic cloves and some sliced onions in lightly seasoned olive oil. The hardest part of this process was making sure the garlic didn't burn. But the smell of roasted garlic and onion in the house was amazing! And the finished confit looked so great, I couldn't wait to try it!
After that, the vegetarian cassoulet recipe felt almost like a cop out, at least compared with the time-intensive steps required for the traditional recipe!! Sautee the vegetables, add the beans, add water and let everything simmer together with the spices and seasonings.
The finishing touch for the cassoulet was toasted garlicky bread crumbs on top. I used some home-made challah for my crumbs, and margarine instead of olive oil to toast. (I used up all of my olive oil in the confit. Had I thought about it, though, that garlicky, oniony oil would have been great on the crumbs!!) Instead of sprinkling the crumbs over each serving as suggested, though, I decided to pour the finished cassoulet into a casserole dish, cover it with the bread crumbs and bake/broil the whole thing. I love the crunchy crumb toppings on dishes, I thought this would be good... Except for the part where I wasn't paying as close attention as I should have, and the top layer of crumbs burned. Like, black burned... Ick... Luckily the crumb layer was thick enough that I could carefully spoon off the charred bits and salvage the flavor and consistency I have been hoping for.
I served the cassoulet with the garlic and onion confit spooned on top. It was really great! The cassoulet itself was fairly mild in flavor, which was fine with me. The confit added a great burst of flavor and richness, which I loved, and the bread crumbs - those which hadn't turned to cinders, added amazing taste and texture. I was so glad that I didn't sit this one out! This might have to become a regular dish, as we all loved it for lunch, and the (plentiful) leftovers were enjoyed by not only us, but a friend who travels to France frequently, and was very interested in trying this vegetarian cassoulet. (She also keeps Kosher, so cassoulet was not something she has the opportunity to eat too frequently when visiting France...)

Thank you so much to Jenni and Lisa for introducing me to both confit and cassoulet! I can honestly say this is not something I would have ever sought out had you not brought it to my attention. I am really glad I tried it, and I can't wait to make it again!!


If you would like to see the amazing creations, both meat and vegetarian, of my fellow Daring Cooks, take a look here and get ready to drool!